Create with vintage and found items. Repurpose. Reuse. Paint. Don’t paint. These are tutorials of my DIY and craft successes – as well as pictures of my DIY and craft failures. Keeping it real, my friend. Keeping it real.
Chic decor? Am I stretching it? Maybe a little…. or maybe not? When I found these little, brightly colored buckets at the Dollar Tree, bells and whistles went off in my brain. A light bulb came on over my head. I had an idea I thunk up all by myself! Sort of. OK. Not really. I’ve seen many other tins and pottery done this way, but to my knowledge haven’t seen these – these particular buckets from the Dollar Tree. So I can almost say it’s my original idea. Right? Yeah. I know. That’s stretching things. I’m a such a copycat.
Let’s paint ’em white and put Vinyl numbers on ’em!
I sprayed them with white Rust-Oleum Protective Enamel
Next, I cut out some vinyl numbers with my Silhouette Cameo die cutting machine and stuck the numbers on the buckets. That’s it. Yer done. Of course you could stencil the numbers on or do an image transfer and if I do more, I’ll probably try those techniques, too. But I’m always looking for ways to use my Cameo. I’ve had it going on a year now and still can’t get over the coolness of it. If you don’t have one yet, maybe it’s time to buy one! Amazon usually has some pretty good prices.
Got a Silhouette die cutting machine you don’t know what to do with? Craftsy offers a class called Silhouette Savvy for $29.99, but they often put classes on sale.
We’re at it again. Opening another booth in a mall new to us, Angels in Opelika, Alabama. It’s a big ‘un. The mall and the booth. Both big. We’ve been working hard the past few weeks getting things ready to go in the booth, but kept having to put the stuff we were finishing into the booth at Longleaf in Alex City because stuff was selling out of there. So now, both booths are kinda bare looking. It’s all taking over our life. There is no life outside of building, painting, fixing, redoing… I’ve even been too tired to look at Pinterest at night!
Here are the pieces we put in Angels:
Stacked benches hubby built and I painted and a five sided table I painted and antiqued.
Before I go further, just let me remind you how much out of my comfort zone I am with painting. But ya do what’cha gotta do.
Adorable mid century nightstand in aqua with black legs.
Fab, mid century dresser in gray and white.
The picture does not show the original, faux wood graining of this chifferobe. It’s really pretty cool. —– Ha! I was trying so hard not to be in the full length mirror that I forgot the little round mirror. So there I am.
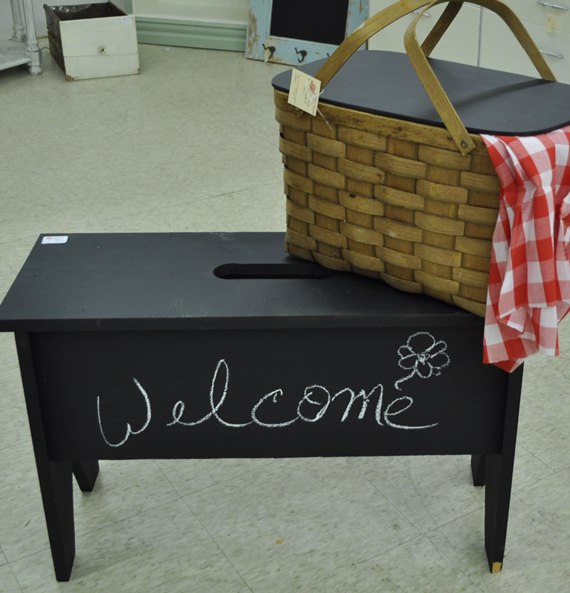
An accident happened during transport. Some wood was knocked off one of the legs. The top was messed up a bit, too. I’ll either have to take some chalkboard paint there to make the necessary repairs or bring it home. The picnic basket top is painted in chalkboard paint, too.
Took this picture before we left the house. An old door with original, chippy paint was cut in half. The panels were painted in chalkboard paint and old hooks were added at the bottom.
A bookcase hubby made, the half door coat rack again and an old tin Hoosier drawer. On the shelf of the bookcase is this little tote:
It’s a small tote with a Graphics Fairy image transfer. I wasn’t completely happy with the image transfer result. But guess what? It was the first thing to sell. I always wonder, when the first thing to sell is “some little something”, nothing special, if someone in the mall bought it to make us feel good, give us a start, or if they truly liked it? In this case I also wonder if they’re going to paint over it? LOL But I suppose it’s cute as is. I know I’m critical because I did it and it didn’t match the vision. But perhaps the … um… messiness of it gives it a more authentic look?
Anyway, if y’all are anywhere near Opelika come on by and see what’s next! We’re still working. Busy, busy, busy. Our booth is all the way to the left. When you walk in the mall, turn left and go as far as you can go. We’re the last corner booth on the right. Booth “OREO”. If I’d known that the name was going to be on the wall, I’d have thought of something more clever. Oreo’s our cat and was the first name that came to mind.
Don’t forget we’re at Longleaf in Alex City and the Pickle Patch Market in Sylacauga, too. We’re booth WC1 at Longleaf and 05 at the Patch. Just ask. And enjoy all the other booths, too! There are some great ones in all three malls. They make for fun outings.
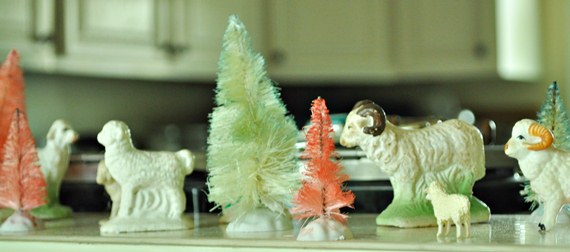
One of the few things I did for Christmas decorating this year was put out some bottle brush trees amongst some sheep on the pass through between the den and kitchen.
That’s how they looked until just a week or so ago. I was lazy. Didn’t put up the decora…… Oh, who am I kidding? I really left them out on purpose, considering them winter decorations with intentions to dye them for Easter. (Giggle, snort, giggle.) Whatever. Anyway, I did it! Completed the whole project. Bleached, dyed and arranged.
There are a gazillion tutorials on bleaching and dying bottle brush trees out there and I won’t repeat all that, but will tell you what I learned. Mainly, do not… DO NOT… leave them in the bleach too long.
I had a big tub filled with bleach, dumped all the trees in and left them. Left them at least 30 minutes, maybe even an hour. That much time wasn’t needed for the bleaching process and it took all the “sizing” out of the branches.
The comment was made that they looked like they’d been through a hurricane. Hrmph. I was hoping I’d be able to tell how easy it was to get them back to normal, but alas, that tale will ne’re be told. I couldn’t. I managed to shape them a bit better, but they’re still messy. I’m OK with the finished look, but our son’s coming up in a few days for a visit and I’m sure he’ll make fun of them. Oh, well.
I dyed them with food coloring. The color didn’t take evenly, but that’s OK, too. I tried adding vinegar to the food coloring first, and forgot to add it when I changed to a different color. It didn’t seem to make any difference, so I just left the vinegar out from then on.
~~~~~
So where have I been the past few weeks? Oh, here, there, nowhere… Had a horrible sinus infection that had me down a few days. Spent a good bit of time getting the estate sale ready that was mentioned in the previous post. Had a couple of my daughter’s baby showers to attend. And frankly, didn’t have a thing in the world to blog about! But the big news of the moment is that our very first grand-darling will be born in the next couple of days! There will soon be a nursery decor post to go along with pictures of what will undoubtedly be the most beautiful child in the world! (Insert big, silly grin here.)
Here’s a quick and easy Valentine’s project for you. It’s not my original idea. I saw it on somebody’s blog a year or two ago. You may have seen it before, too. I do so wish I remember whose it was so I could give her credit, but that was pre Pinterest and it was easy enough for me to remember without bookmarking it.
You know I’m all about easy. And I know you can look at them and tell exactly how they were done, but just in case there’s a question… here’s how. Just get a pack of chipboard hearts and a French script stamp from Hobby Lobby or Michaels. Paint the hearts, stamp them and you’re done. I used regular white craft paint, nothing special there, and Staz-On black ink. So go get your craft on! Let’s make something today!
Hi! I'm Wanda, the owner of Just Vintage and this is my blog where I talk about buying, selling, and decorating with all things vintage. I want to help you learn what to buy for resale and maybe give you inspiration in decorating, even if it's what NOT to do.
We use cookies to ensure that we give you the best experience on our website. If you continue to use this site we will assume that you are happy with it.