Posted on Leave a comment

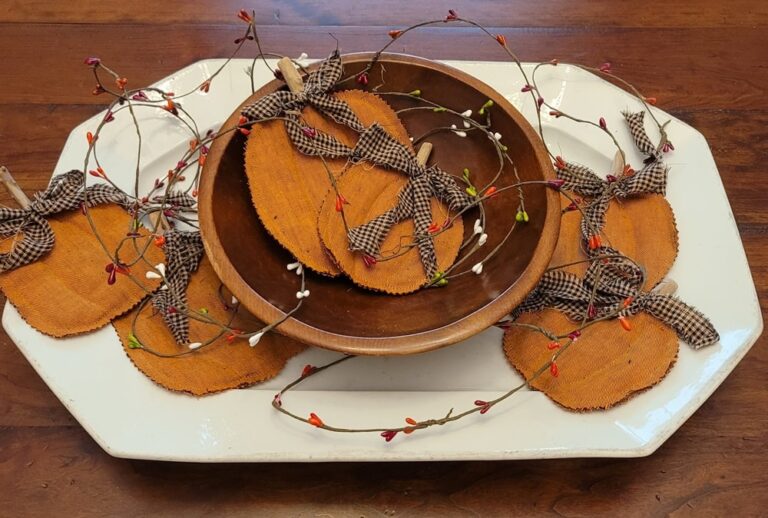
How To Make Fabric Pumpkin Bowl Filler Flatties

How to make flat fabric pumpkin bowl fillers

These fabric pumpkin bowl fillers are fun, easy, and inexpensive to make! I saw these done by the fabulous Melissa Marro of Vintage Bee Designs (You can watch her ~video here~. ) They’re toward the end, but it’s all worth the watch.) I did mine slightly differently from hers, working with my “less than” talent and what I had on hand.


You’ll need:

  • Fabric for pumpkins
  • Fabric or ribbon to tie around the stem
  • Thin quilt batting
  • Something to use for the stems such as sticks from the yard, some type of finial or, I used these wood sticks from The Dollar Tree
    However, I can’t find them on Dollar Tree’s web site and didn’t see them the last time I was in the store. But Amazon has plenty of choices! Here is a link to craft wood stems suitable for pumpkin stems on Amazon. (Affiliate link)
  • A pattern for the pumpkin or maybe you can draw it free hand. I sure can’t. I found a pumpkin pattern from Silhouette Studio and cut it out of cardstock
  • Something to draw or trace your pattern. I use slivers of Dove soap on the fabric and a black marker on the batting.
  • Pinking shears
  • Glue – whatever kind you prefer
  • Sewing machine. Although, you could stitch by hand or glue the stitching lines, but the results won’t be the same

I’ll bet you have most of that on hand. I did have to go buy the sticks from The Dollar Tree. We live in a new subdivision that is devoid of trees. I’d have had to get some exercise and walk a good bit to find any sticks. Yeah, yeah. It wouldn’t have hurt me to walk. But I didn’t.


  1. Find your pumpkin pattern. I made mine in two sizes, 5″ in diameter and 4″ in diameter. Since my freehand drawing stinks, I used a simple design I found in the Silhouette store, but you can also find one using a Google search and looking in Images. You can get as detailed as you feel comfortable, but for this project, you probably want to keep it really simple. I used this SVG file from Silhouette Studio. It seems to be called Pumpkin Basket.

    If you’re familiar with SVG files, you know you can separate, or ungroup, every element, so I singled out one pumpkin and deleted the rest. Then I singled out the inside lines. This is what I had to work with:

  2. Draw your outside shape on the fabric, then place the lines on top and trace them. If you use something like I did, you’ll have to finish the tops of the lines. If that makes sense.

  3. Trace the outer lines of the pumpkin on some thin batting. I advise cutting a bit smaller than the pattern so you don’t have much, if any, batting showing after sewing the edges together.

  4. Place the batting between the layers of fabric. You’ll have to kind of feel to see where your edges are and readjust. This does not have to be perfect! You’re not making an heirloom quilt here. It’s just seasonal bowl fillers.

  5. It’s time to sew! Sew the outline first, leaving a hole at the top large enough to fit the stem in. Then sew the center lines. Again, don’t worry about perfection. I know, I know, it’s hard for some of us, but just relax and do it. I promise, when you get them out next year, you’ll wonder why you stressed about perfection.

  6. Trim around the edges with pinking shears. Another option would be to fray the edges if your fabric is willing.

  7. Poke that stem in and glue tight around the fabric edges. I didn’t get a picture of this, but I think you can figure it out. I did have to saw off my sticks a little. You really don’t want it to go too far into the center of the pumpkin. You want it just far enough to be secure. Maybe about 3/4″-1″ into the pumpkin. How much you leave sticking out the top is just a visual thing. You’ll have to be the judge here. And yet again, it’s not a science.
  8. Rip strips of the bow fabric. Trim off any realllly long strings, but leave most of the strings that naturally happen. Or if you choose ribbon, cut it. I used about 22″ lengths ripped to about 1″ wide. I didn’t try to get the wrinkles or twists out. Just let them be natural. Tie them tightly around the stems. A simple shoe tie bow is fine. Or if you’re a talented bowmaker, use that talent! You might want to use a dab of glue on the tie. I skipped that.
    How to make flat fabric pumpkin bowl fillers
    And you’re done!

How to make flat fabric pumpkin bowl fillers

I hope you enjoy making these fabric flattie pumpkin bowl fillers. Another use would be to string them and make a fall garland.

Leave a Reply

Your email address will not be published. Required fields are marked *

This site uses Akismet to reduce spam. Learn how your comment data is processed.

Posted on 1 Comment

Lamp Part and Pieces Upcycle

Upcycled lamp base

Today on the blog: Upcycling lamp parts in a way you might not have thought of.

You know how we find ugly or broken lamps or even just pieces of lamps at the yard sales, estate sales and thrift stores? Well, thrift stores probably throw out the badly broken ones, but sometimes pieces will show up. I’m always watching for these things, but it’s been a minute since I’ve actually upcycled one.

A few months ago I found these little cherubic guys at a sale. Ignore the work space, please and thank you!

I had no idea what their original use was. I thought it was a candle holder and that was what I intended to use it for. Recently, a friend in a Facebook group I’m a member of shared a floor lamp and there were these little guys at the base, holding a tall porcelain lamp! Mystery solved.

When I got home with them, I saw the broken spot, the hole at the base. I don’t know if it’s my old eyes, excitement – or desperation – to find something or just plain ol’ carelessness, but I miss things like this all the time. Do you?

Hmmmm….. What to do? Oh! I’ll use air dry clay to “repair” the hole and paint the whole thing!

But after I went to the trouble of repairing it, I had an epiphany. I realized that the top opening, the spot I thought would hold a candle, was too big for a candle. Remember, it was originally holding a porcelain lamp base/thingy. I really liked the antiqued look of the metal and didn’t much want to paint it and….. hey! I know! It needs reindeer moss! The moss could cover the repair – it could have covered the hole if I’d thought of it earlier and saved me that trouble. But what could they be holding if not a candle? Why, a ball of moss, of course! I found a small, styrofoam sphere in my stash, covered the parts that would be visible with reindeer moss, shoved it down into their hands, sat it on a bed of moss, and called it done.

But it still needed something – okay, okay. I knew I’d do this all along, but the picture above shows most clearly how the moss was attached – so I added a cloche and then called it done. (Why is it that the pictures like the one in the workspace and the one without the cloche are the better pictures, but the one that kinda counts, the one that should be Pinterest, Instagram and blog worthy is never a good/better picture?)

The cloche is from one of those cheap, plastic anniversary clocks, that have a glass dome, that we can sometimes find for a couple of bucks. I toss the clocks and keep the domes. I have several in my arsenal. I have kept the clock faces, but have never used them, so I don’t anymore.

As a side note, the iron base it’s sitting on is also a lamp part. It’s part of a hanging kerosene lamp. And sometime in my yard sale shopping, I happened to find a round piece of glass that fit perfectly. Friends, you have to hit the sales every weekend and go to every one as early as possible!

It’s all part of this vignette at the moment. The chest was from one of my favorite dealers at Angel’s Antique Mall in Opelika, Alabama, who is, devestatingly to me and many others I’m sure, closing her booth. Everything else is from yard and estate sales over the years. The candlesticks, I learned recently, are a Southern Living product. They and the cloche are the youngest things in the vignette. I might, but probably don’t, have as much as $250 total invested in everything here and that includes the $200 chest and the pictures that go on up the wall that you can’t see here.

So go out and keep an open mind with those parts and pieces if you don’t already!


You might want to check out some of my other fun lamp base transformations:
Curbside find – Floor lamp base turned pedestal
Don’t pass up those lamp bases! – Some Lamp Base Crafts

Reindeer Moss on Amazon (Affiliate link. It costs you nothing more and I’ll get a tiny stipend for my work. If you choose to use it, thanks!)


Pin it…..

Pin it! Cherub Lamp Base Upcycle

Leave a Reply

Your email address will not be published. Required fields are marked *

This site uses Akismet to reduce spam. Learn how your comment data is processed.

Posted on Leave a comment

How To Make These Farmhouse Clothespins

Decorated Clothes Pegs Farmhouse Style

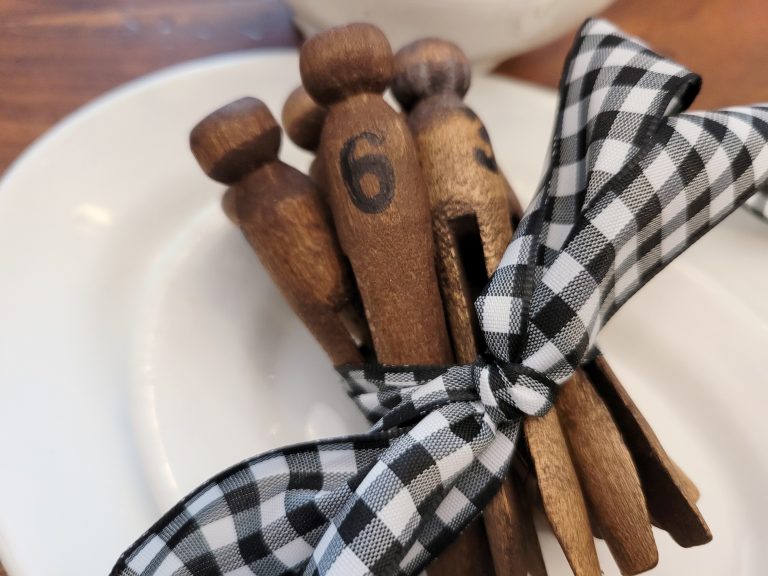
I did a thing! I decorated these clothespegs and strapped a camera on my head while doing the last one so I could share with you how to do it. They are great with white ironstone, farmhouse decor or primitive decor. And sooooo quick and easy to do!

All you need is

  • Some clothes pegs – mine came from yard sales, but you can get a bag at any craft store or stores that sell crafts
    And here that is on Amazon
  • A black stamp pad – My preference is StazOn
    And find this on Amazon
  • Stamps – Use numbers or letters or even words. Whatever floats yer boat
    They’re on Amazon too, but good grief! So many choices!
  • A pipe cleaner
  • Rubber gloves

The video is only 3 or 4 minutes long and that’s start to finish one clothes peg. It’s that quick.

Enjoy!