Posted on Leave a comment

Vintage Easter Decor

Decorating with vintage Easter decor

Decorating for Easter with vintage Easter decor and collectibles. Vintage Easter items, pre-1960s can be hard to find. My collection is small but fun. Quite a few are incorporated into my normal decor and showcased in this blog post.

This post has been in the plans for several weeks, but I just couldn’t get decent photos! So I gave it one more try, played with filters to get the colors right and here we are. I hope to inspire you to rescue the vintage Easter items from the attics, basements, and ultimately landfills. Because when they’re gone, they’re gone. Start your own collection if you haven’t already!

The post is picture-heavy. My apologies. I’ve tried to get them as compact and fast loading as possible.


Vintage Easter Decor

Before we get to the nitty gritty, let’s just put this right here.

~~~~~~“He Is Risen”~~~~~~


Vintage paper mache bunnies

The only two paper mache bunnies in the collection. I’d love to have more!

Vintage Easter collectibles with 1960s cottage cheese Easter container

The basket on the right is a cottage cheese container from the 1960s.

Baseball skin cabbage bowl for Easter bunny

I made the baseball skin, cabbage bowl basket several years ago and showed how here.

Vintage Easter collections - Wire Easter egg dye kit egg dippers and wax crayons

Two of my more unusual collections: Wire Easter egg dippers and the wax crayons from egg dye kits.

Decorating with vintage Easter collectibles

How adorable is the wooden bunny pulling the wagon? It’s a particular favorite.

Decorating with cintage Easter collectibles

Now, let’s move to the shelves in the living area:

Using vintage Easter collectibles in your decor

The bunny in the box is my earliest memory of an Easter basket toy.

He’s a little worse for wear these days, but then, so am I. If only we could turn back time. And now that you’ve seen that black and white picture, you know I’m officially old!

Moving on…………

How to use vintage Easter collectibles in your decor
Ways to use vintage Easter collectibles in your decor
Using Easter collectibles in your decor
Vintage Easter collectibles

Now, a few other areas.

Vintage Easter collectibles
1950s tin musical crank Peter Cottontail

The tin Peter Cottontail crank toy (Turn the crank and it plays Here Comes Peter Cottontail) is another early Easter memory. The one pictured isn’t my original toy. The original probably went the way of a yard sale around 1973, but I was thrilled to find this one at an estate sale some years back.

Birdcage filled with vintage Easter eggs

What do you do with a nearly a hundred, good, old, hard plastic Easter eggs? Why put them in a bird cage! That doesn’t look like that many, but I counted as I put them in. I don’t remember exactly, but it was surprisingly close to 100.


There is actually more. I could have kept going, but this post is long enough already, and as I said earlier, picture-heavy. So I’ll call this one done. Hope you found some little bit, some tiny snippit of motivation or inspiration!

Posted on Leave a comment

How To Make Fabric Pumpkin Bowl Filler Flatties

How to make flat fabric pumpkin bowl fillers

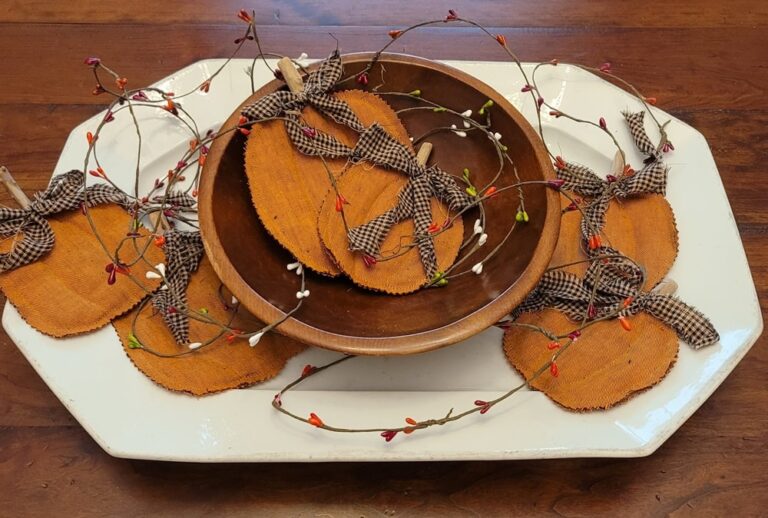
These fabric pumpkin bowl fillers are fun, easy, and inexpensive to make! I saw these done by the fabulous Melissa Marro of Vintage Bee Designs (You can watch her ~video here~. ) They’re toward the end, but it’s all worth the watch.) I did mine slightly differently from hers, working with my “less than” talent and what I had on hand.


You’ll need:

  • Fabric for pumpkins
  • Fabric or ribbon to tie around the stem
  • Thin quilt batting
  • Something to use for the stems such as sticks from the yard, some type of finial or, I used these wood sticks from The Dollar Tree
    However, I can’t find them on Dollar Tree’s web site and didn’t see them the last time I was in the store. But Amazon has plenty of choices! Here is a link to craft wood stems suitable for pumpkin stems on Amazon. (Affiliate link)
  • A pattern for the pumpkin or maybe you can draw it free hand. I sure can’t. I found a pumpkin pattern from Silhouette Studio and cut it out of cardstock
  • Something to draw or trace your pattern. I use slivers of Dove soap on the fabric and a black marker on the batting.
  • Pinking shears
  • Glue – whatever kind you prefer
  • Sewing machine. Although, you could stitch by hand or glue the stitching lines, but the results won’t be the same

I’ll bet you have most of that on hand. I did have to go buy the sticks from The Dollar Tree. We live in a new subdivision that is devoid of trees. I’d have had to get some exercise and walk a good bit to find any sticks. Yeah, yeah. It wouldn’t have hurt me to walk. But I didn’t.


  1. Find your pumpkin pattern. I made mine in two sizes, 5″ in diameter and 4″ in diameter. Since my freehand drawing stinks, I used a simple design I found in the Silhouette store, but you can also find one using a Google search and looking in Images. You can get as detailed as you feel comfortable, but for this project, you probably want to keep it really simple. I used this SVG file from Silhouette Studio. It seems to be called Pumpkin Basket.

    If you’re familiar with SVG files, you know you can separate, or ungroup, every element, so I singled out one pumpkin and deleted the rest. Then I singled out the inside lines. This is what I had to work with:

  2. Draw your outside shape on the fabric, then place the lines on top and trace them. If you use something like I did, you’ll have to finish the tops of the lines. If that makes sense.

  3. Trace the outer lines of the pumpkin on some thin batting. I advise cutting a bit smaller than the pattern so you don’t have much, if any, batting showing after sewing the edges together.

  4. Place the batting between the layers of fabric. You’ll have to kind of feel to see where your edges are and readjust. This does not have to be perfect! You’re not making an heirloom quilt here. It’s just seasonal bowl fillers.

  5. It’s time to sew! Sew the outline first, leaving a hole at the top large enough to fit the stem in. Then sew the center lines. Again, don’t worry about perfection. I know, I know, it’s hard for some of us, but just relax and do it. I promise, when you get them out next year, you’ll wonder why you stressed about perfection.

  6. Trim around the edges with pinking shears. Another option would be to fray the edges if your fabric is willing.

  7. Poke that stem in and glue tight around the fabric edges. I didn’t get a picture of this, but I think you can figure it out. I did have to saw off my sticks a little. You really don’t want it to go too far into the center of the pumpkin. You want it just far enough to be secure. Maybe about 3/4″-1″ into the pumpkin. How much you leave sticking out the top is just a visual thing. You’ll have to be the judge here. And yet again, it’s not a science.
  8. Rip strips of the bow fabric. Trim off any realllly long strings, but leave most of the strings that naturally happen. Or if you choose ribbon, cut it. I used about 22″ lengths ripped to about 1″ wide. I didn’t try to get the wrinkles or twists out. Just let them be natural. Tie them tightly around the stems. A simple shoe tie bow is fine. Or if you’re a talented bowmaker, use that talent! You might want to use a dab of glue on the tie. I skipped that.
    How to make flat fabric pumpkin bowl fillers
    And you’re done!

How to make flat fabric pumpkin bowl fillers

I hope you enjoy making these fabric flattie pumpkin bowl fillers. Another use would be to string them and make a fall garland.

Leave a Reply

Your email address will not be published. Required fields are marked *

This site uses Akismet to reduce spam. Learn how your comment data is processed.

Posted on Leave a comment

Christmas Home Tour At the New House 2019

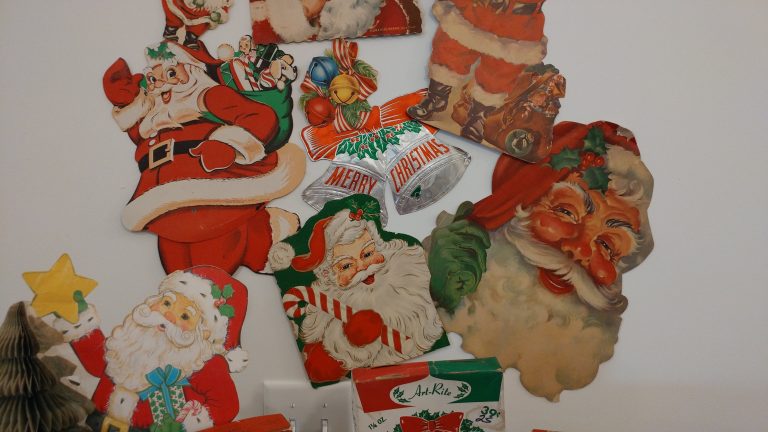
Here’s our Christmas home tour for 2019. Don’t know what to do with all your Christmas collections? Or maybe you think you have too much and need to feel better about yourself that you don’t have as much as what you’re about to see. Or maybe your collection puts mine to shame! Or maybe you just enjoy looking at how other people decorate for Christmas. Or you’re looking for something else to collect. Or… or…. whatever! Here’s our home at Christmas of 2019. I’ve focused only on the Christmas decorations because, well, the regular decor leaves a lot to be desired yet.

When you have this much, and yes, it is an addiction, and not even half of the collection is in the following pictures, you don’t just add a wreath here, a stocking there, some pine over there. It totally and completely takes over everything. It’s a lot of work, but oh so fun once it’s done. Then clean up time comes. Yuck.

Let’s start with the dining room. This is where all the glitz and glamor went.

Beaded floral picks, foil garland, ball arrangements, mercury glass candles…

I don’t seem to have got a picture of the tree toppers. And that light spot on the buffet top? I left a miniature pumpkin sitting too long one year. It looked fine on top, but the bottom…um… leaked. Let that be a warning to you. Watch those pumpkins!

Now, let’s see some Santas on the hearth:

And Santas on the wall. Above vintage Christmas boxes:

Snowmen?

Let’s finish with the shelves in the casual eating area. A camel collection, foil star tree toppers and the Merry Christmas banner I grew up with.

No, that’s not all, but all I have time to share this year. Hope you have a most excellent Christmas and remember “The Reason For the Season!”

Posted on 2 Comments

Using Vintage Halloween Decorations In Your Decor

Vintage Halloween Decorations

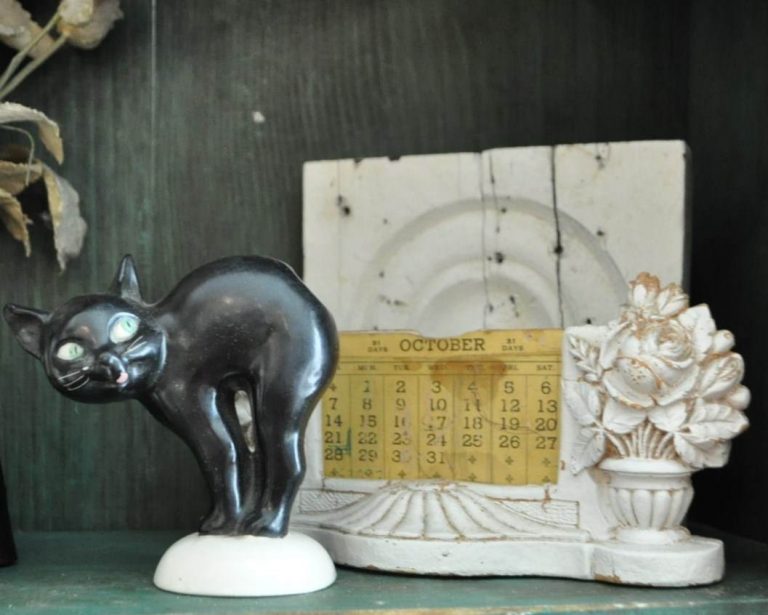
So you have some vintage Halloween decorations and wondering what to do with them? In this post I share what I did this year. In previous years I’ve simply arranged everything on the mantle. This year, in the new house, the mantle wasn’t a good place for all that, so I spread the items around. On one hand, they have more of a punch amassed, but there’s something to be said about working them in with your regular decor.

Halloween Decor Pinterest Pin Continue reading Using Vintage Halloween Decorations In Your Decor